English

0 item(s)
View cart
You have no items in your shopping cart.

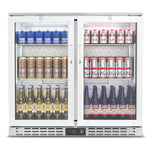
Undercounter bar refrigerators provide significant practical value in bars and other venues. They keep ingredients, garnishes, and cocktail shakers within easy reach, greatly streamlining service. Using this type of refrigerator offers numerous benefits: it not only optimizes space usage, creating a more organized and tidy bar area, but also improves service speed and efficiency by reducing the time staff spend retrieving items. Additionally, these units offer enhanced temperature control, a sleeker appearance, and lower energy consumption.

Proper installation is crucial to unlocking the full potential of an under counter bar refrigerator, as it directly affects both its performance and longevity.
Pre-installation preparation is essential for avoiding unexpected issues during installation.
First, carefully inspect the refrigerator’s packaging and exterior. After unpacking, check the exterior for scratches, dents, or other damage, and make sure the door sits flush and the seals are intact.
Next, take precise measurements. Use a tape measure to check the designated installation space, including its width, height, and depth. Ensure these dimensions match the beverage refrigerator’s actual size, and allow for adequate clearance. Typically, we recommend leaving at least 2-4 inches of clearance around the sides for proper ventilation (unless it’s a front-vented built-in model).

Finally, inspect the installation location. The area must be level and sturdy—any tilting of the floor can compromise the back bar cooler’s stability and proper functioning. Additionally, ensure there is a suitable power outlet nearby, and verify that the outlet’s voltage and current match the refrigerator’s specifications.
Once these preparations are complete, you can begin the installation.
First, clean the installation area. Clear away any debris from the designated space, and make sure it’s free of dust and obstructions to create a suitable environment for placing the beer fridge.
Second, adjust the refrigerator’s casters or leveling feet. Based on the flatness of the installation area, adjust these components to ensure the unit sits stably.

Third, connect the power cord. Plug the cooler into the designated outlet and ensure a secure fit to guarantee proper electrical contact. The refrigerator will then start operating. Keep an eye out for any unusual noises or indicator light activity.
Coolake stands out among numerous brands, offering a diverse selection that balances affordability with sleek, modern design. Its built-in lock and precise temperature control make it ideal for storing delicate beverages like wine, effectively preventing premature spoilage. The safety features also make it a top choice for business owners storing high-value items, helping small business owners achieve quality on a budget.
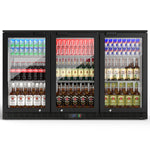
Once you’ve installed and invested in the right equipment, using simple organizational strategies can make it even more efficient. For example, storing frequently used beverages at eye level for quick access, keeping commonly used ingredients within easy reach, organizing drinks by category or brand, and implementing a first-in, first-out system will further boost efficiency and maximize the value of your undercounter refrigerator.